Spring is in full swing at our house and I’m so happy to be saying bye bye to winter!
The twins are begging to do something besides stare at their phones.
Or, am I begging them to do something other than stare at their phones!
I’ve been gathering some super fun science experiments that are perfect for this time of year. Some that I did with my kids, and some cool new ones I found when I was “mom-ing” on Pinterest.
These are all relatively easy to set up (because who has time for complicated prep?) and use stuff you probably already have around the house.
My kids literally squealed with excitement when we tried some of these back in the day…and I didn’t even have to make a special trip to Walmart!
If you need more ideas, check out my list of fun summer activities set up.
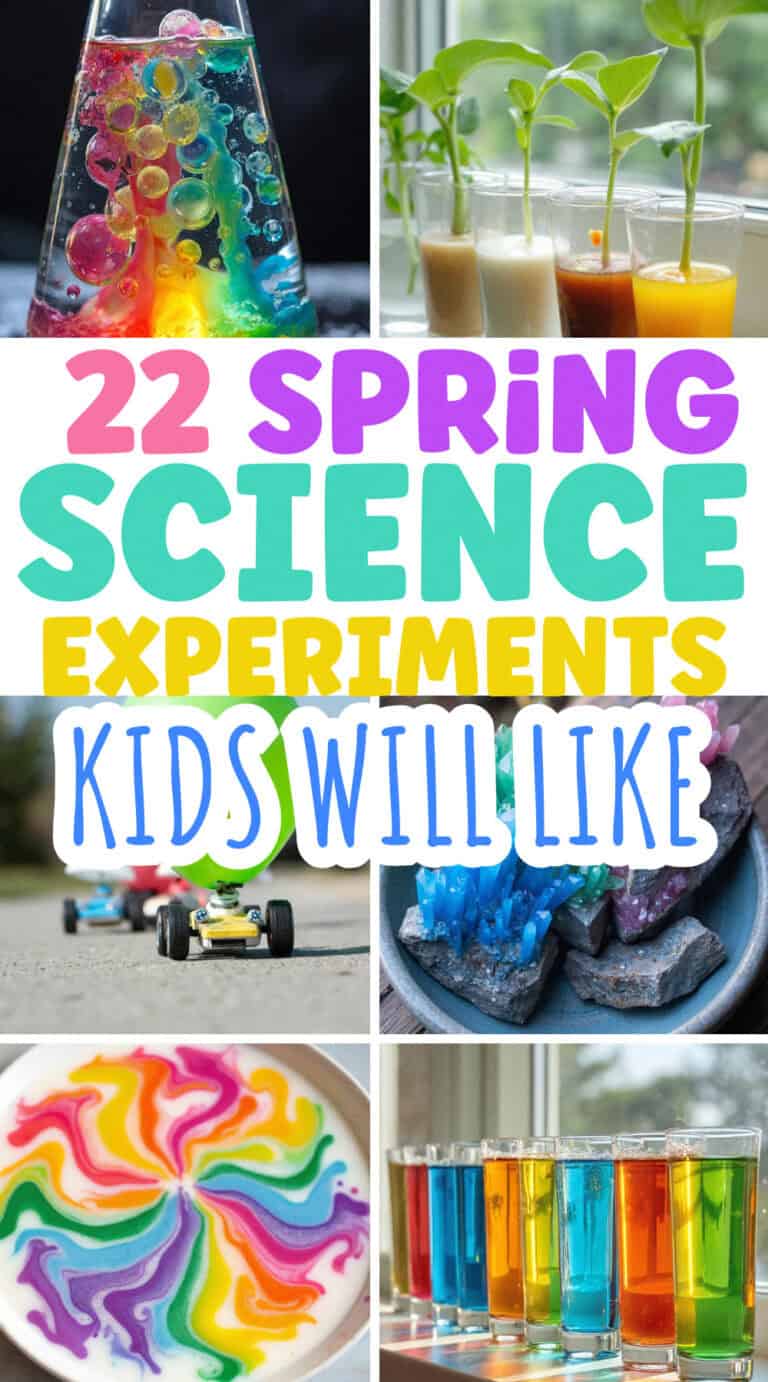
1. Rainbow Walking Water
This experiment is pure magic in the eyes of little ones! All you need are 7 clear cups, paper towels, water, and food coloring.
Set the cups in a row and fill alternating cups with water colored with red, yellow, and blue food coloring (leaving empty cups between each).
Take half-sheets of paper towel, fold them lengthwise, and place one end in a colored water cup and the other in an empty cup.
The water “walks” up the paper towel and into the empty cup, creating new colors as they mix.
The science here is capillary action—the same way plants draw water up from their roots.
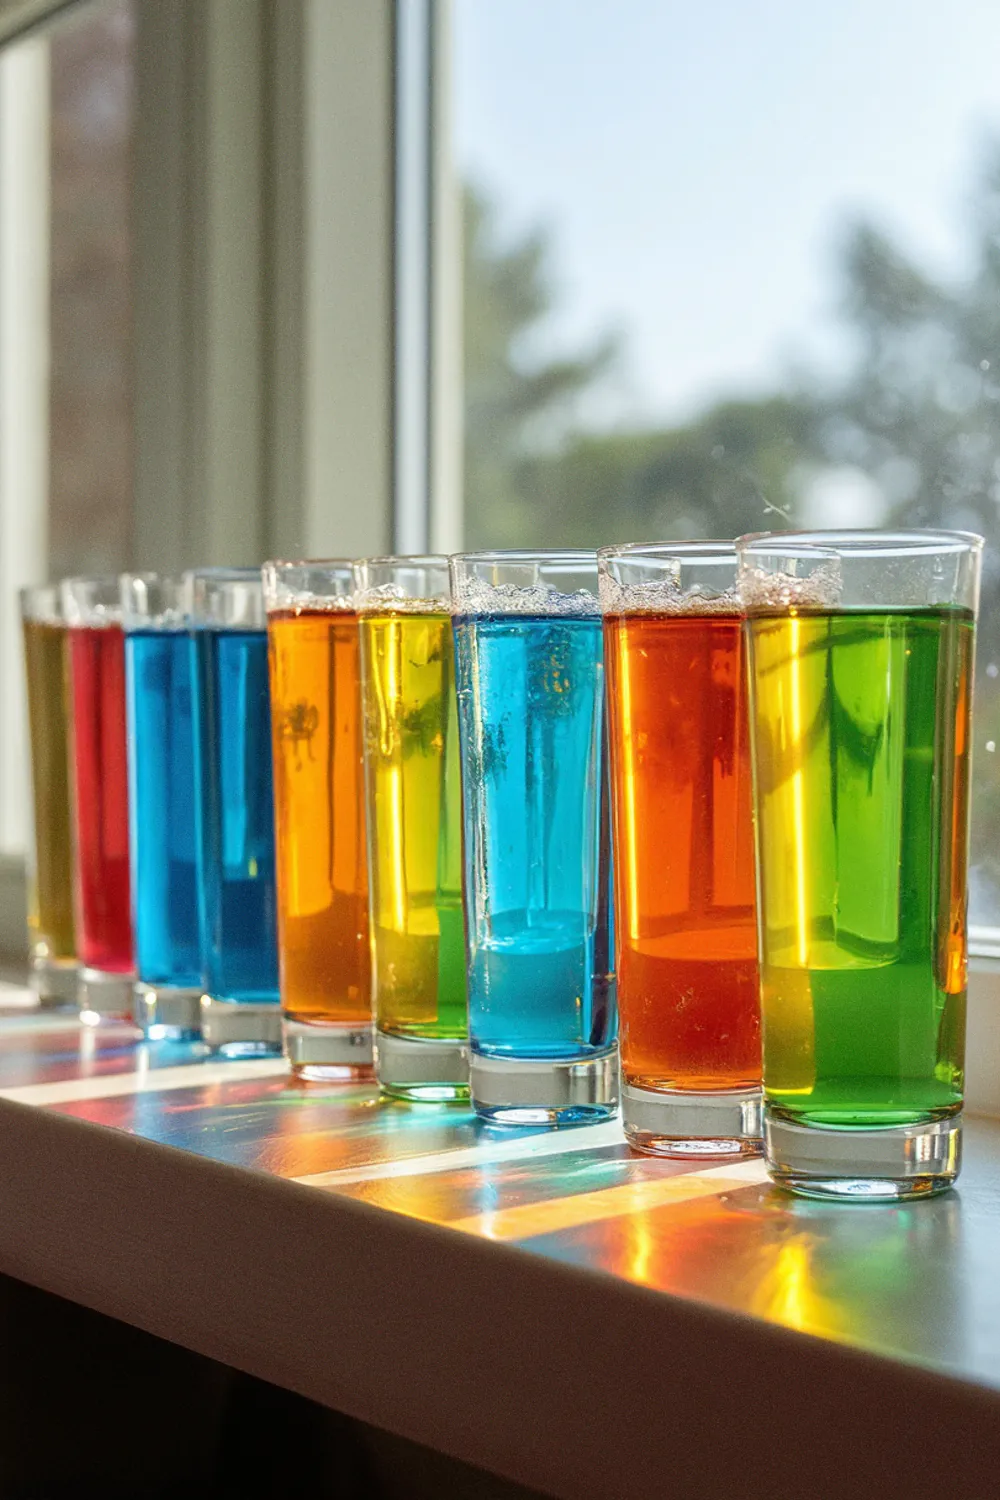
2. Seed Growth Observation Jars
Spring is all about growth, so why not show kids exactly how seeds transform into plants?
Line the inside of a clear jar with a damp paper towel, then place seeds (beans work great!) between the paper towel and the glass.
Keep the paper towel moist but not soaking, and place the jar in a sunny spot. Within days, your kids will see the seeds sprout and start developing roots and stems.
What makes this experiment extra cool is that you can try different types of seeds and compare how quickly they grow or how their root systems differ. You can also test what happens when you place some in sunlight and others in shade.
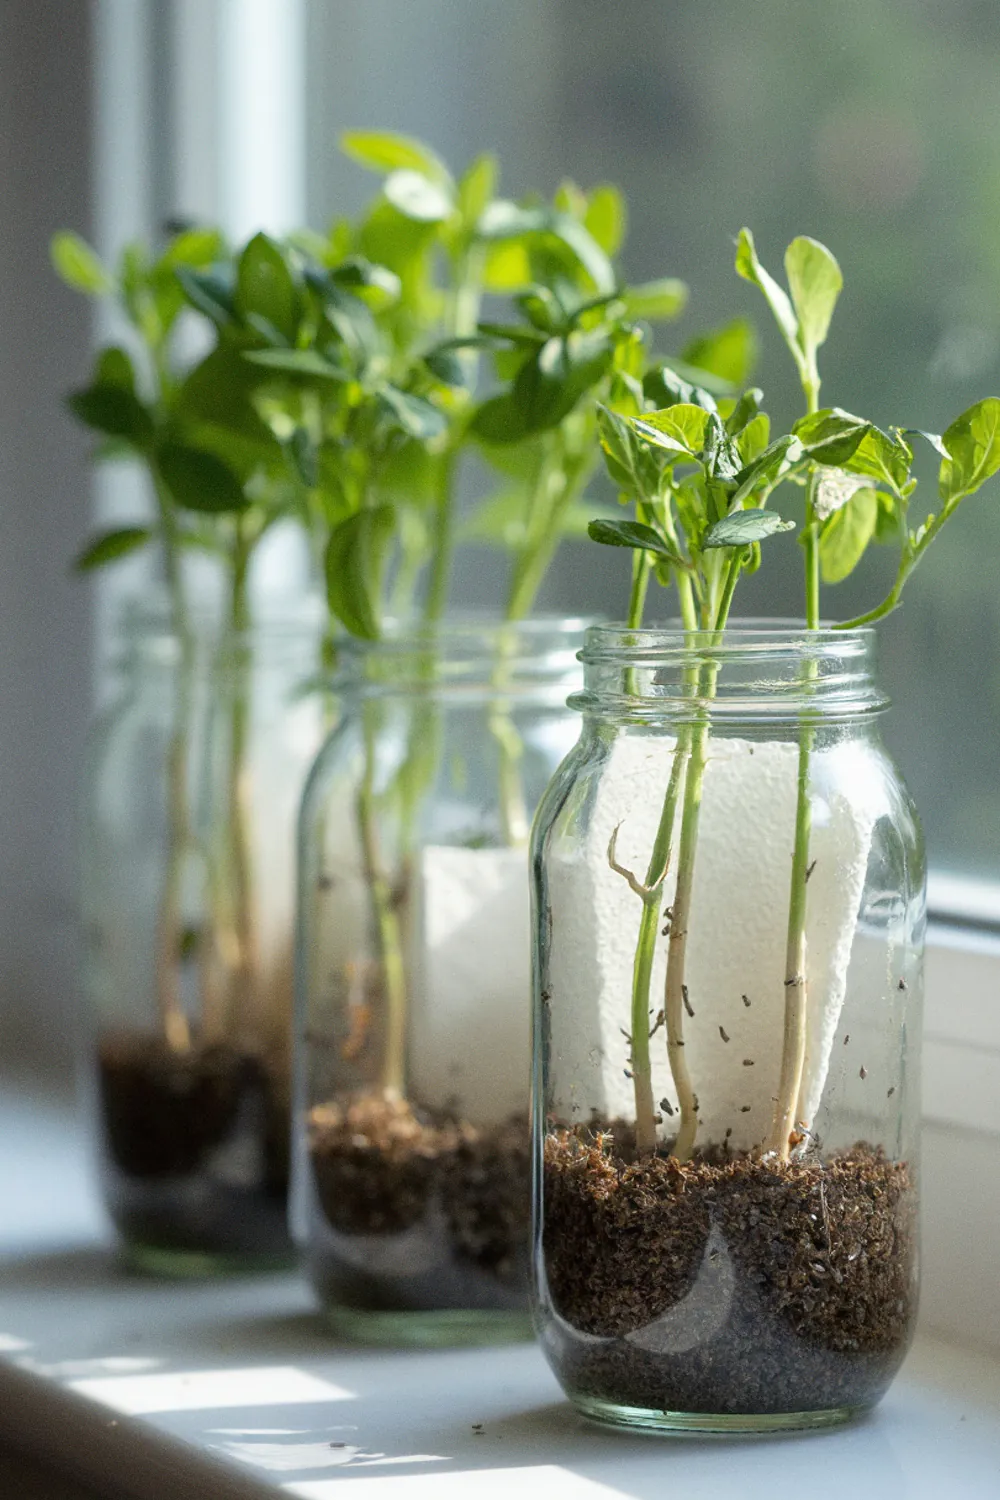
3. Butterfly Feeding Station
We created this at our house a few years ago and the twins went CRAZY when real butterflies actually showed up! Create a butterfly feeding station by mixing 1 part sugar with 4 parts water in a shallow dish.
Place bright fake flowers around it (I grabbed some from the dollar store) and add some overripe fruit pieces nearby. Bananas, oranges, and watermelon work great.
Put your station in a sunny, sheltered spot in your yard, and wait for the butterflies to discover it! The sugar water mimics the nectar butterflies naturally feed on, while the fruit provides additional nutrients.
Oh and keep an eye out for hummingbirds too!
4. DIY Rain Gauge
April showers bring May flowers, right? Track exactly how much rain is falling with this super simple DIY rain gauge!
Take a clear plastic bottle (like an empty 2-liter Coke bottle), cut off the top third, and invert it to create a funnel. Secure it with clear tape if needed.
Use a ruler and permanent marker to create measurement lines up the side of the bottle in centimeters or inches. Place the gauge in an open area of your yard where trees or buildings won’t block the rainfall.
After each rainfall, have the kids record the water level in a journal and then empty it for the next storm. Over time, they’ll start to see patterns in rainfall amounts and can even create graphs showing the rainiest days or weeks of spring.
5. Exploding Seed Bombs
These “bombs” don’t actually explode, but they do burst with beautiful wildflowers! Mix 5 parts clay soil (available at Home Depot), 1 part wildflower seeds (also…Depot), and 1 part water until you can form small balls.
Let the balls dry for 24-48 hours until they’re completely hardened. Once dry, the kids can toss these seed bombs into empty areas of your yard or community garden spaces.
When it rains, the clay dissolves, “exploding” the seeds onto the soil where they’ll soon sprout into colorful wildflowers. This is such a fun way to teach kids about seed dispersal in nature.
The best part is checking back throughout the spring and summer to see what grows.
6. Carnation Color Change
This classic experiment never gets old! Grab some white carnations from the grocery store floral section (they’re usually around $5 for a bunch).
Fill several cups with water and add different food coloring to each cup. Trim the stems of your carnations at an angle and place one flower in each cup.
Within hours, the white petals start to take on the color of the water as the flower draws it up through its stem. If you want to get extra creative, try splitting the stem halfway up and placing each half in different colored water!
The science behind this is transpiration and capillary action. The flowers pull water up through tiny tubes in their stems to replace moisture lost through their petals and leaves.
7. Dancing Raisins Experiment
This experiment had my 8-year-old son laughing so hard he nearly fell off his chair. Kids, ahem. Fill a clear glass with club soda or any clear carbonated beverage.
Drop in a handful of raisins and watch closely. The raisins will sink to the bottom at first, then start to “dance” up and down in the liquid!
What’s happening? The carbon dioxide bubbles in the soda attach themselves to the wrinkly surface of the raisins. As bubbles accumulate, they lift the raisin to the surface. At the top, the bubbles pop, releasing the gas, and the raisin sinks again…only to repeat the process!
This is such a simple activity but demonstrates density and buoyancy in a way kids can actually see.
8. Rainbow Milk Explosion
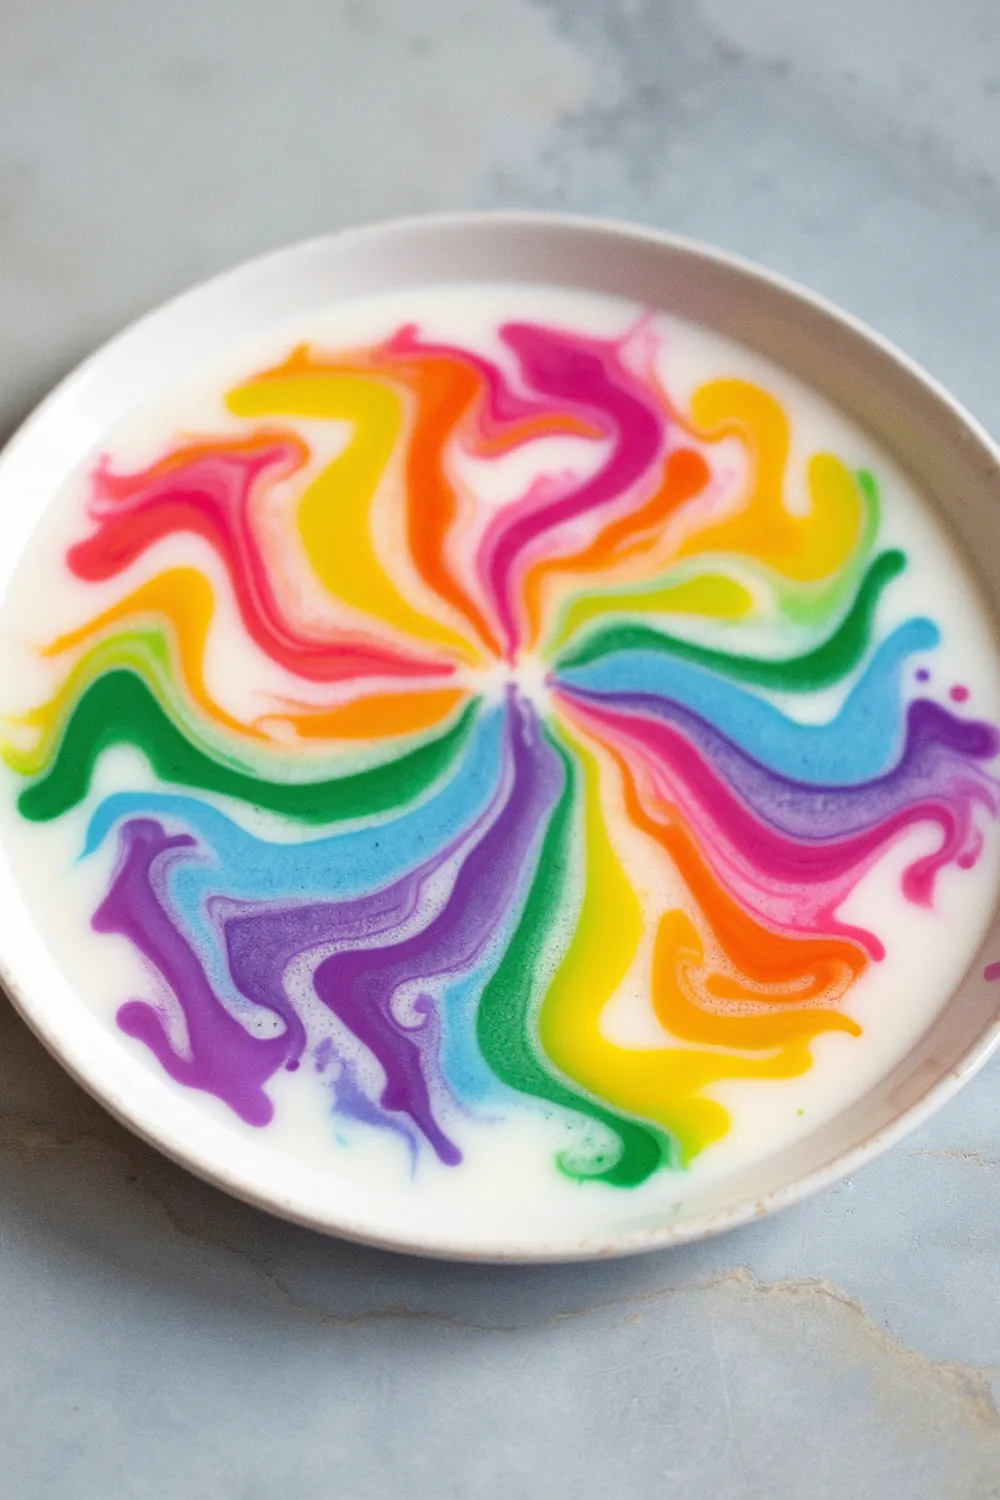
Pour a thin layer of milk into a plate and add drops of different food coloring.
Have your child dip a cotton swab in dish soap and touch it to the milk’s surface.
Watch the colors explode and swirl!
The dish soap breaks the surface tension of the milk and reacts with the fat molecules, creating movement that sends the colors dancing.
It’s a perfect 5-minute activity when you need to distract the kids while making dinner.
9. DIY Solar Oven S’mores
Turn a pizza box into a solar oven.
Cut a flap in the lid, line it with aluminum foil, and cover the opening with plastic wrap.
Place graham crackers with chocolate and marshmallows inside.
Position your oven in direct sunlight with the reflective flap angled to direct sunlight inside.
In about 30-45 minutes, you’ll have melty s’mores.
This demonstrates how solar energy works and the greenhouse effect—plus you get a tasty treat!
The twins were amazed that the sun could actually cook food without any electricity.
10. Crystal Garden
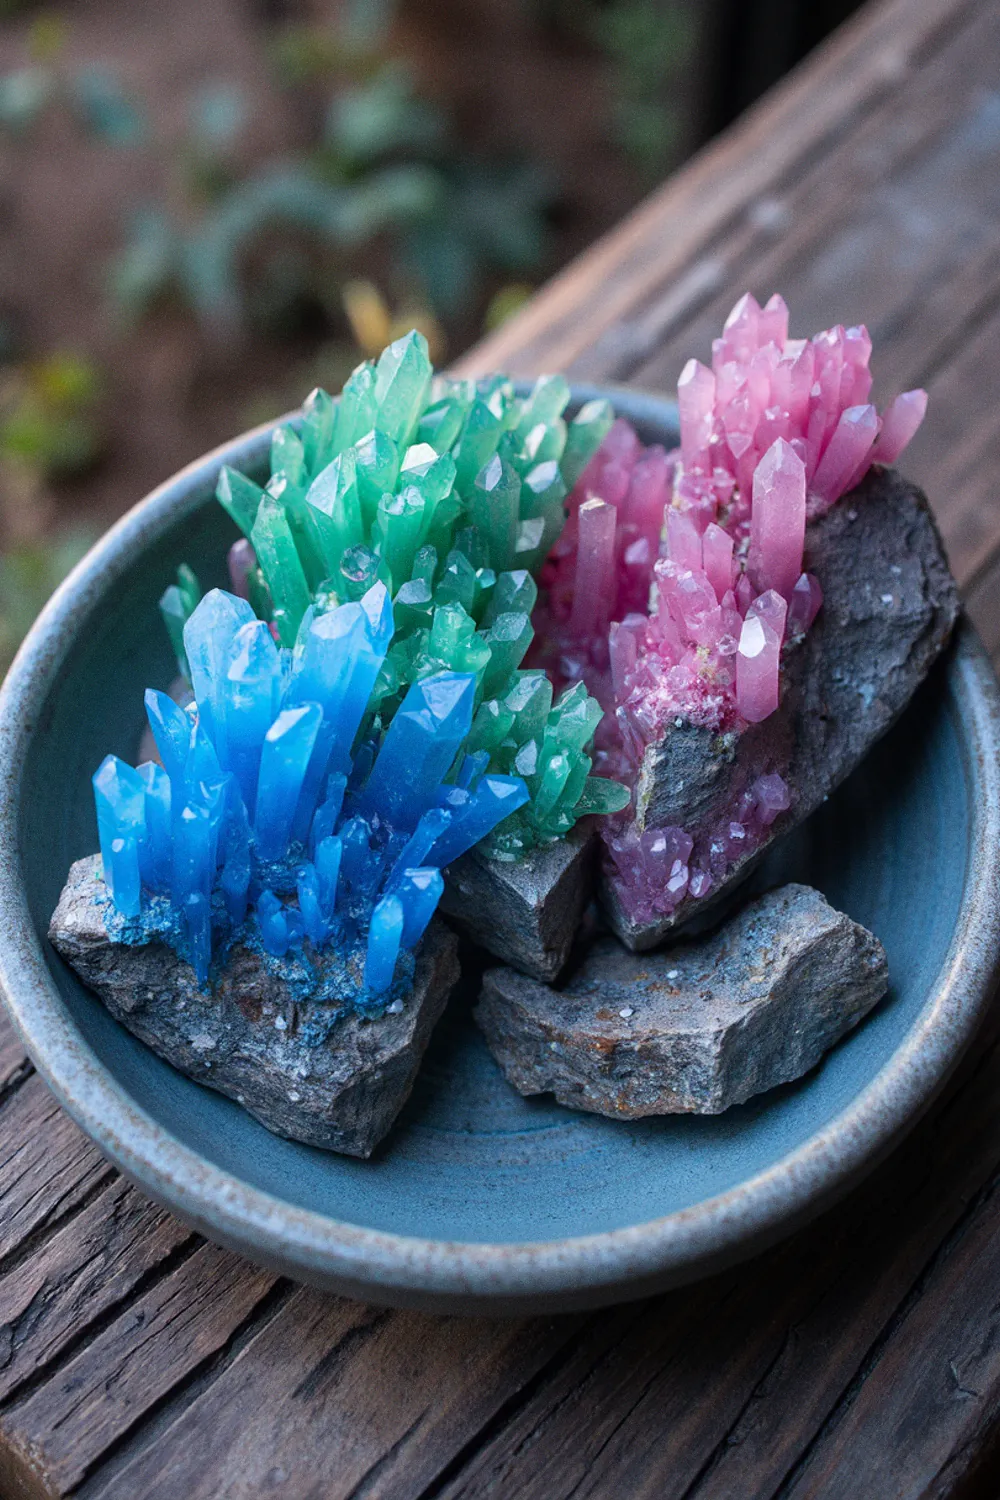
Create beautiful crystal formations using household ingredients.
Adult supervision required for this one mamas!!
Mix 6 tablespoons of salt, 6 tablespoons of water, 6 tablespoons of bluing (find it in the laundry aisle), and 1 tablespoon of ammonia (toxic).
Pour over porous materials like pieces of coal, brick, or sponges in a shallow dish.
Add drops of food coloring throughout.
Within hours, crystals start forming, and they’ll continue growing for days.
We did this in school when I was a kid, you probaly did too!
11. Homemade Lava Lamp
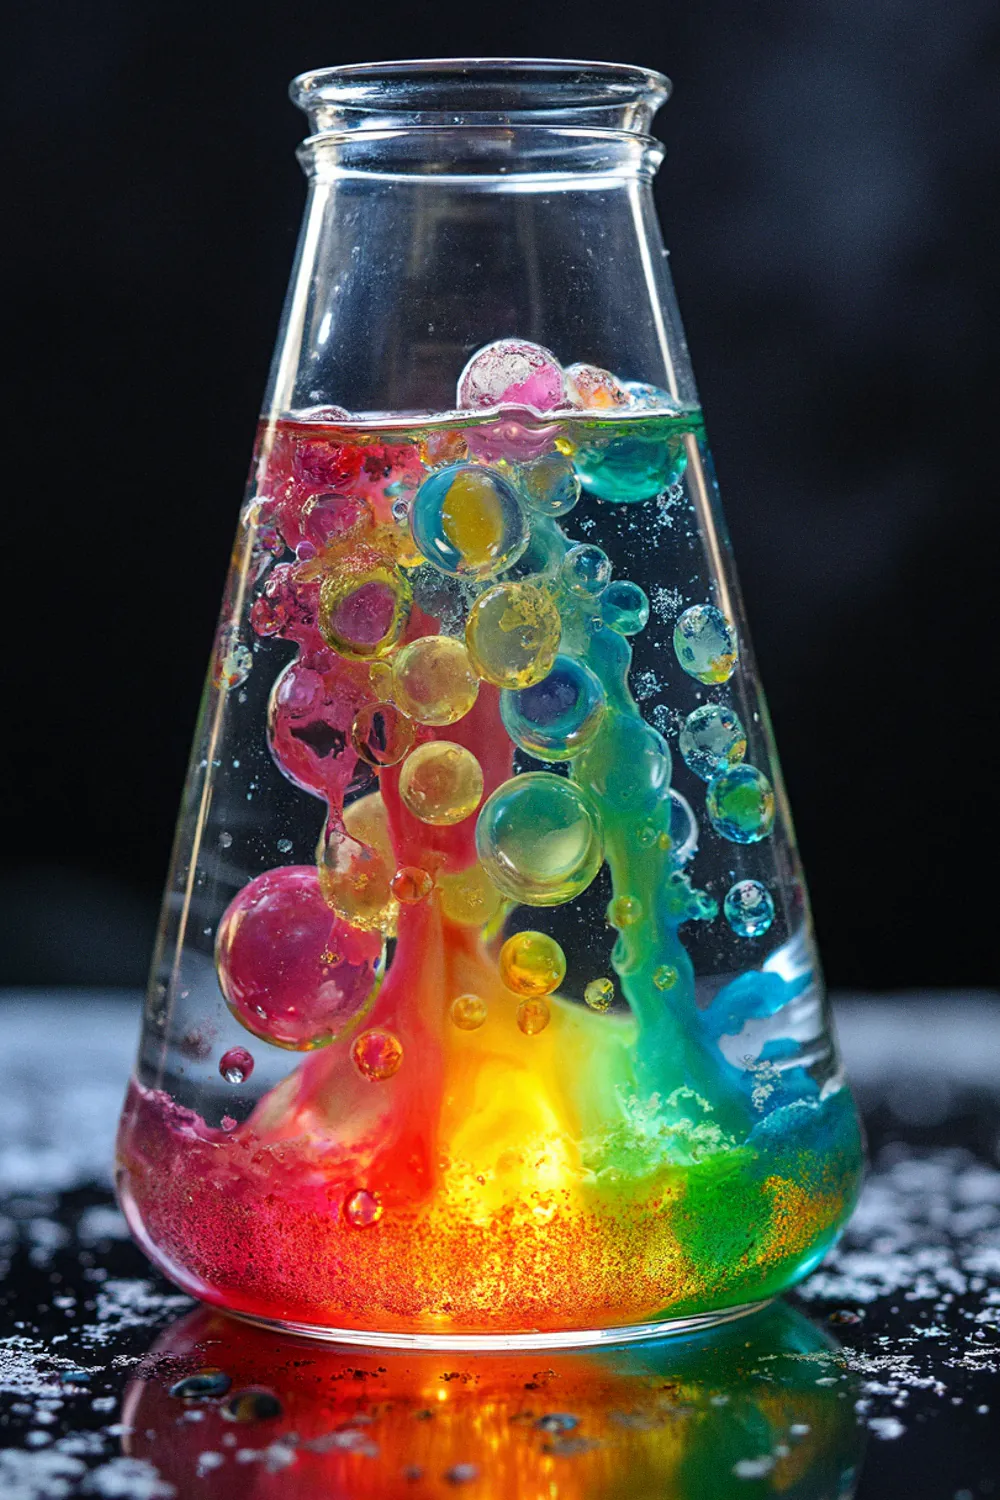
Fill a clear bottle 2/3 with veggie oil and 1/3 with water.
Add food coloring (it will only color the water).
Drop in half an Alka-Seltzer tablet and watch as colorful bubbles form and rise through the oil!
The bubbles are carbon dioxide gas released from the tablet, which attach to colored water droplets and carry them upward.
When the gas escapes at the top, the water drops back down.
It’s honestly mesmerizing even for adults hehe.
12. Natural Egg Dyes
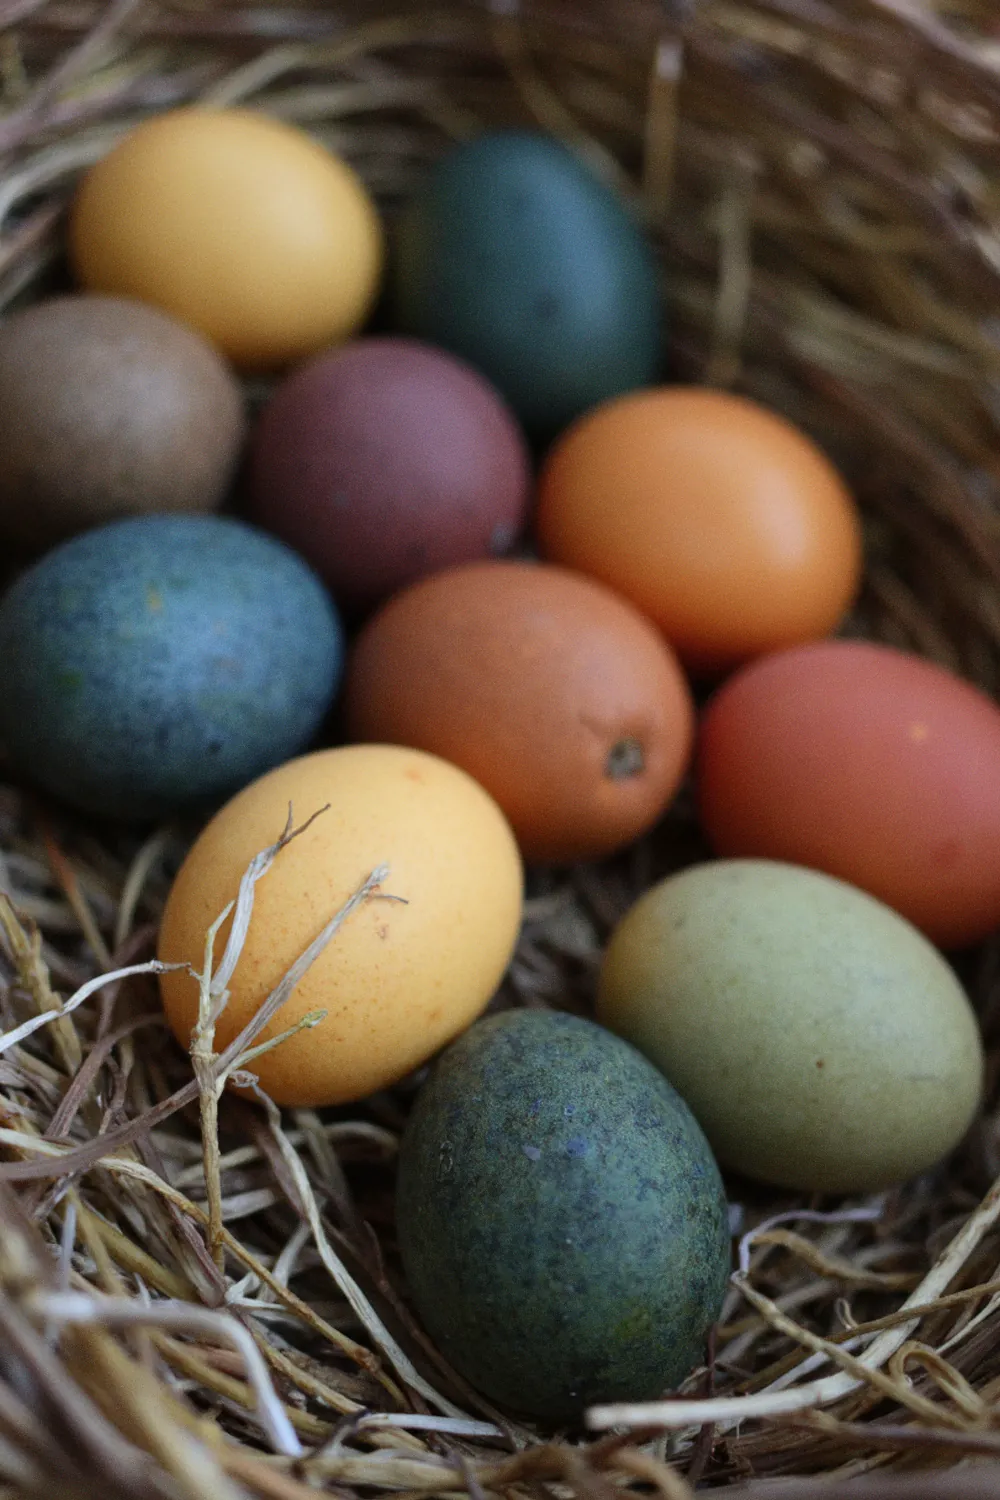
Skip the artificial dye kits this spring and make natural egg dyes from kitchen ingredients.
Boil eggs, then soak them in different natural dyes: turmeric for yellow, red cabbage for blue, onion skins for orange, beet juice for pink, and spinach for green.
Add a tablespoon of vinegar to each dye bath to help colors set.
Let them sit overnight in the fridge for the most vibrant colors.
The science here is about pigment extraction and absorption—and the results are gorgeous, less chemical-filled eggs!
13. Flower Dissection
Turn spring flowers into a biology lesson.
Collect different flowers from your garden or buy an inexpensive bouquet.
Give kids magnifying glasses and tweezers to carefully pull apart the flowers and examine their parts.
Identify petals, sepals, stamens, and pistils.
They can tape the parts to paper and label them.
My daughter was fascinated to learn that flowers have “boy parts” and “girl parts” and how pollination works.
Try comparing different flower types to see structural similarities and differences.
14. Wind-Powered Cars
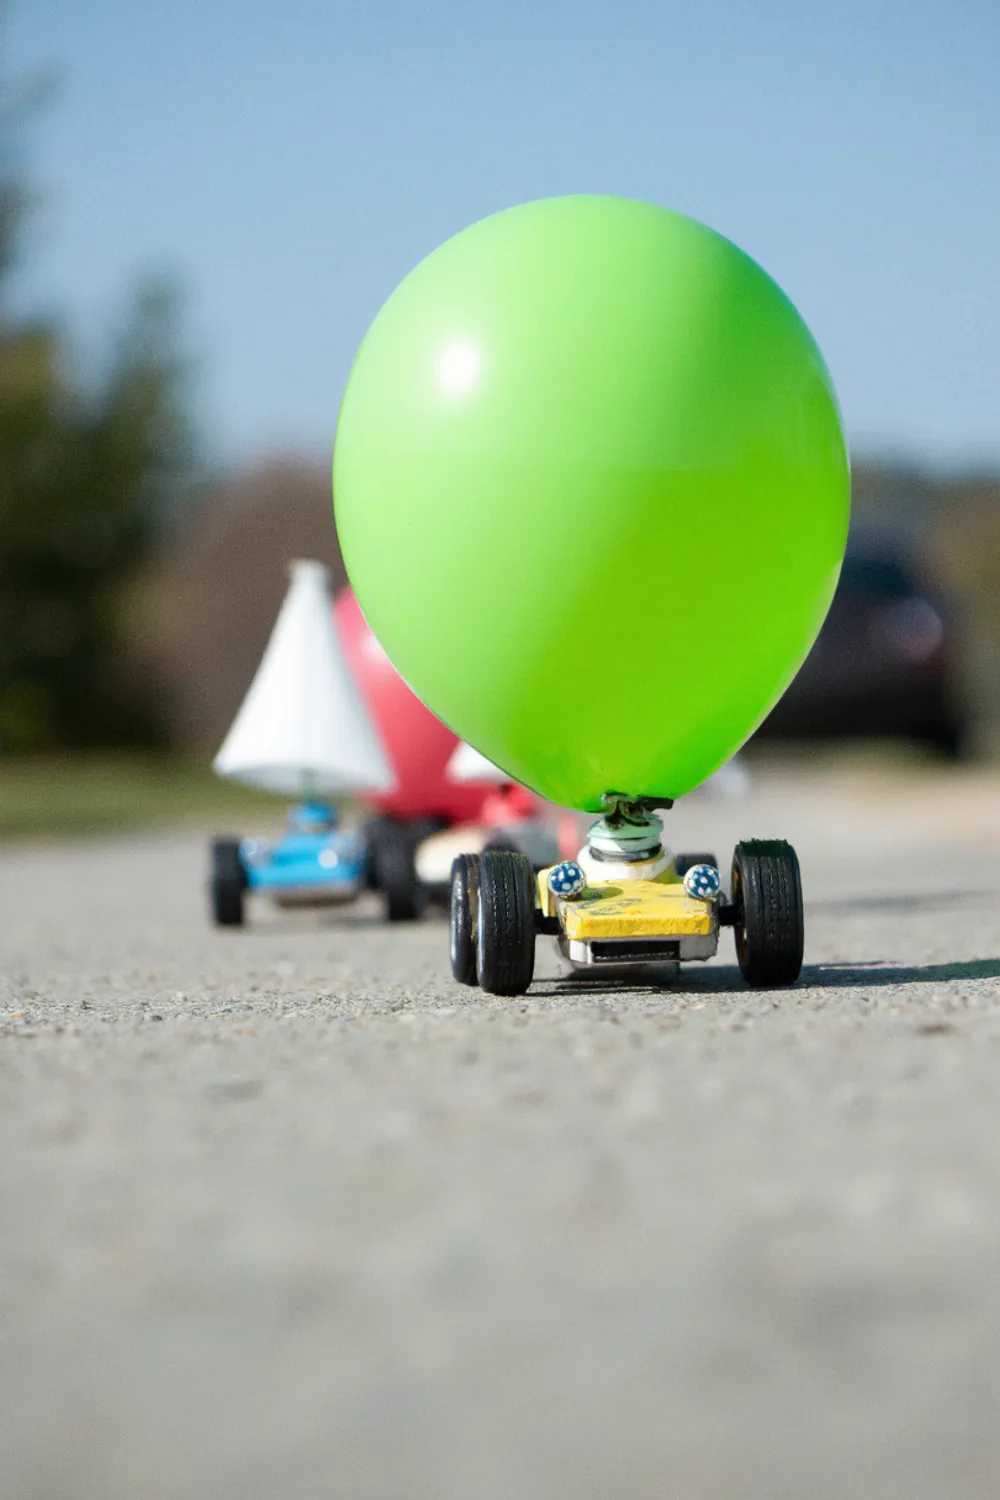
Create cars powered by spring breezes.
Use recycled materials like cardboard, bottle caps for wheels, and straws for axles.
Add a sail made from paper or attach a balloon that can be inflated and released to propel the car forward.
Test designs on a smooth surface outdoors on a windy day, or create wind with a fan indoors.
This demonstrates Newton’s Third Law (every action has an equal and opposite reaction) and lets kids experiment with aerodynamics and design modifications.
15. Squishy Circuits
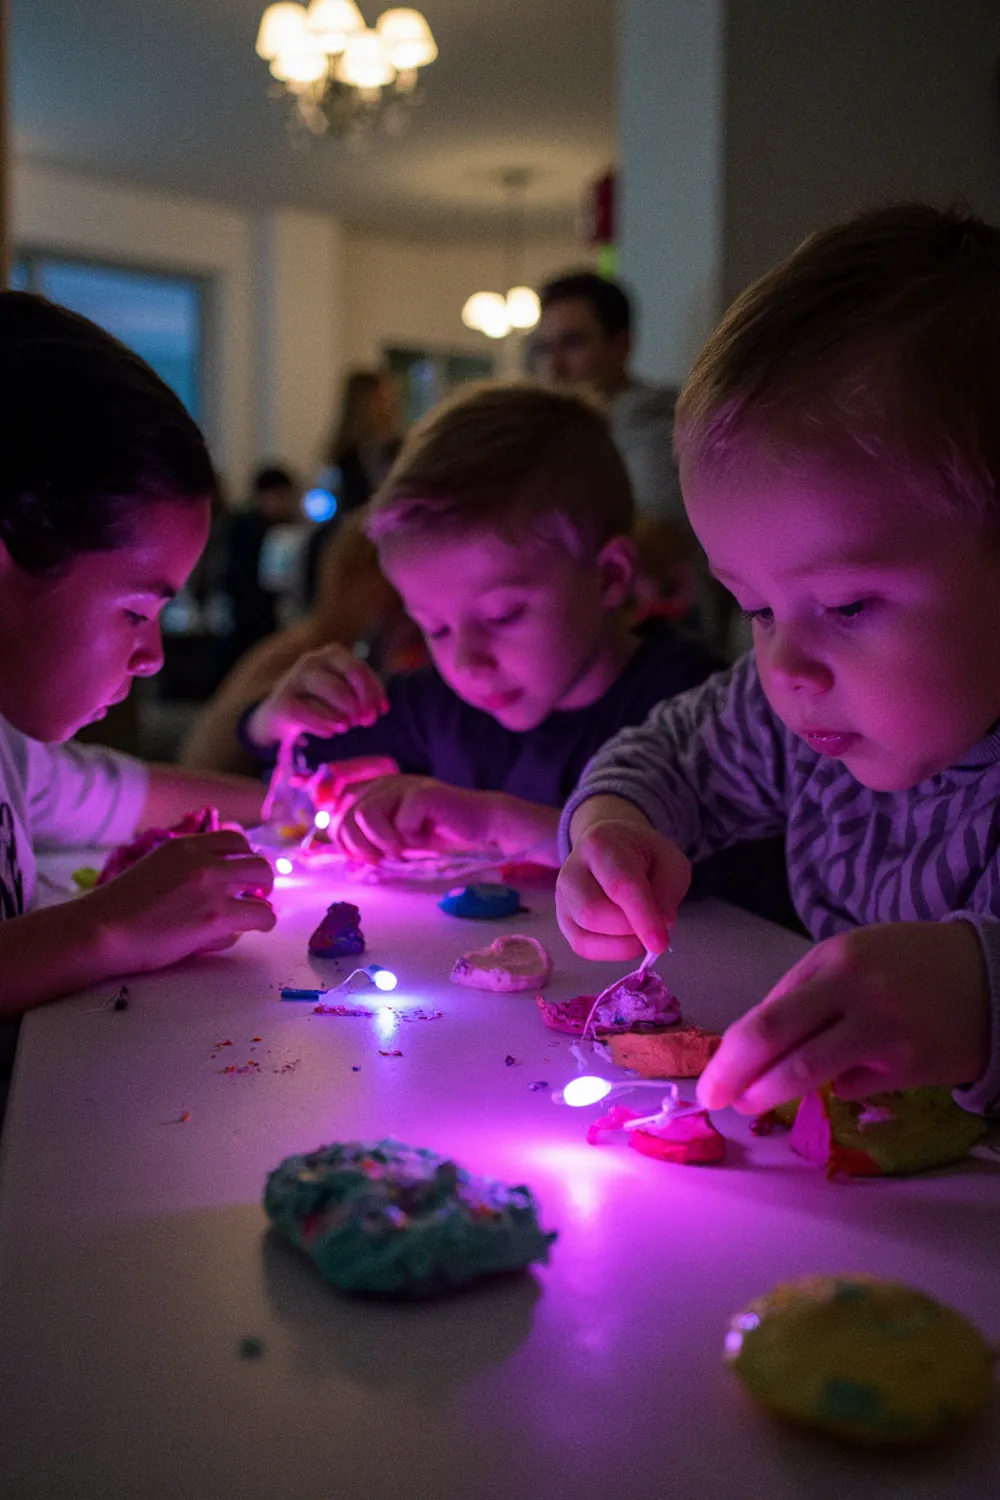
Make play dough that conducts electricity.
Mix 1 cup flour, 1/4 cup salt, 3 tbsp cream of tartar, 1 cup water, 1 tbsp vegetable oil, and food coloring.
This conductive dough can complete a circuit when connected to a battery and LED lights.
Also make insulating dough by replacing salt with sugar.
Kids can build 3D sculptures that light up!
The salt in the conductive dough allows electricity to flow through it, while sugar doesn’t conduct electricity.
16. Rainbow Bubble Snakes
Cut the bottom off a water bottle, stretch an old sock over the cut end, and secure with a rubber band.
Dip the sock end in bubble solution (dish soap + water).
Add drops of different food coloring directly onto the sock.
Blow through the bottle’s mouth to create rainbow bubble snakes that can stretch several feet long!
The science involves surface tension and how soap molecules arrange themselves in water.
Plus, the colorful results look absolutely magical floating across the yard!
17. Cloud in a Jar
Create a miniature cloud in a jar.
Pour hot water into a glass jar, spray hairspray into the jar (this acts as condensation nuclei), then immediately cover with a lid topped with ice cubes.
Watch as a cloud forms inside.
When the warm, moist air hits the cooled air at the top, condensation occurs around the hairspray particles.
When you remove the lid, the “cloud” escapes in a puff!
This demonstrates how real clouds form and is especially relevant during spring’s often changeable weather.
18. DIY Compass
Make a simple compass using a needle, magnet, leaf, and bowl of water.
Magnetize the needle by rubbing it with a magnet about 50 times in the same direction.
Place the needle on a small leaf or piece of paper and float it in water.
Watch as the needle aligns itself north-south!
This demonstrates Earth’s magnetic field and how early explorers navigated.
My son thought this was the coolest thing ever and kept checking it against my phone’s compass app to verify it worked!
19. DIY Kaleidoscope
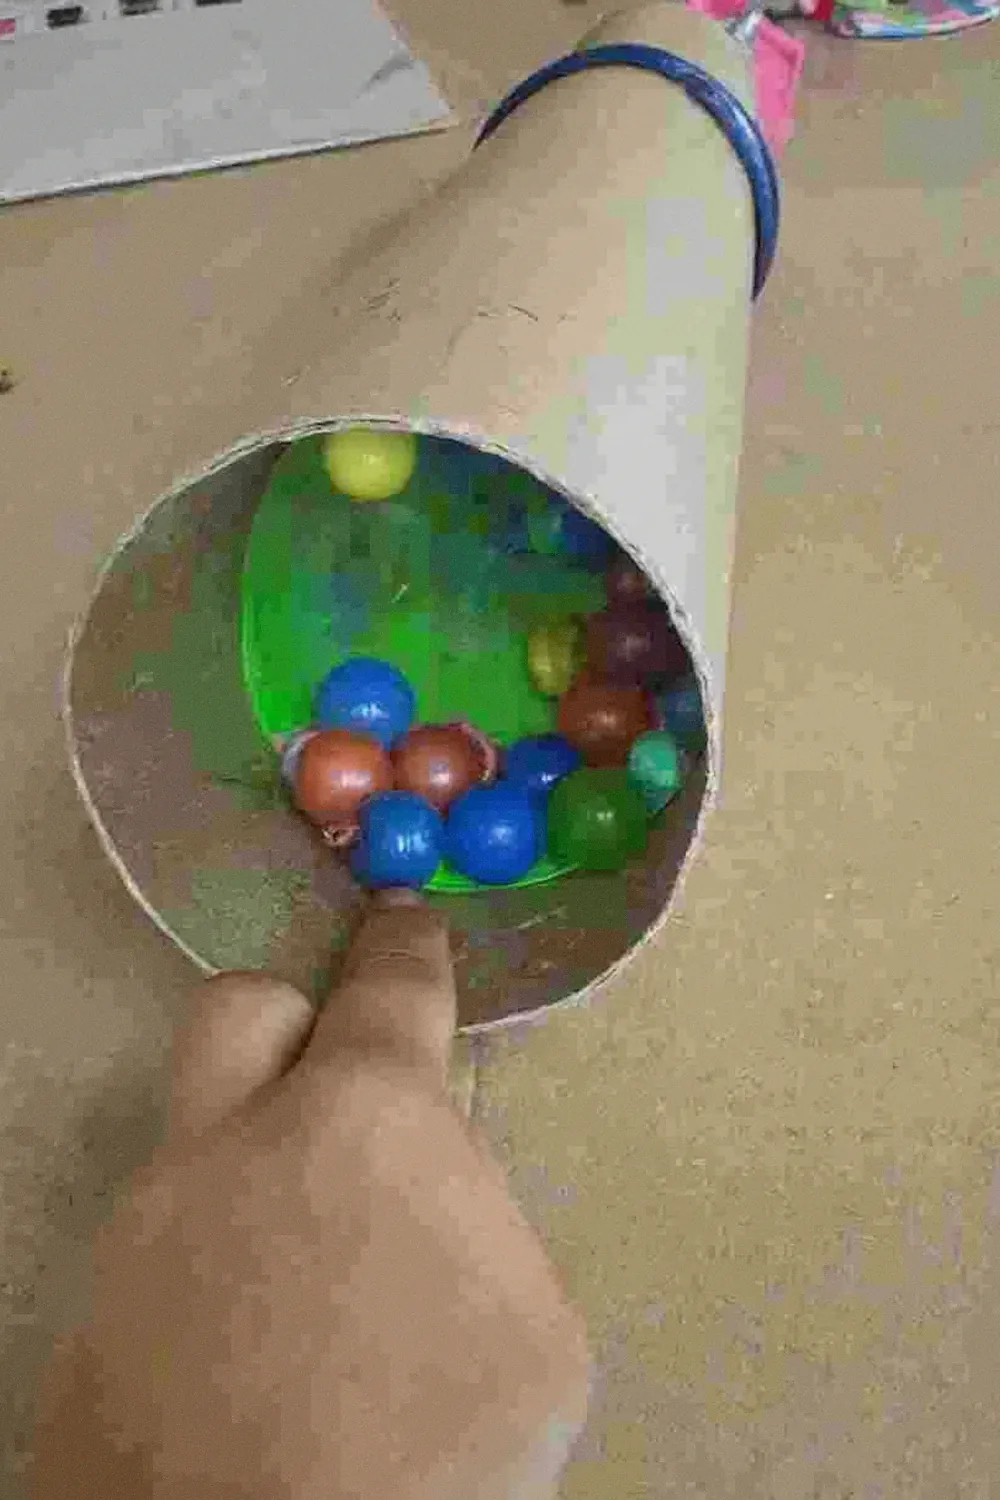
Create a kaleidoscope using a cardboard tube, reflective paper or small mirrors, clear plastic, and colorful beads or sequins.
Arrange mirrors in a triangle inside the tube, secure a clear disk with colorful objects at one end, and cover the other end with a peephole.
When children rotate the tube and look through it, they’ll see beautiful symmetric patterns.
This demonstrates principles of light reflection and symmetry.
It’s the perfect rainy day project that combines art and science beautifully.
20. Grow Plants in Different Liquids
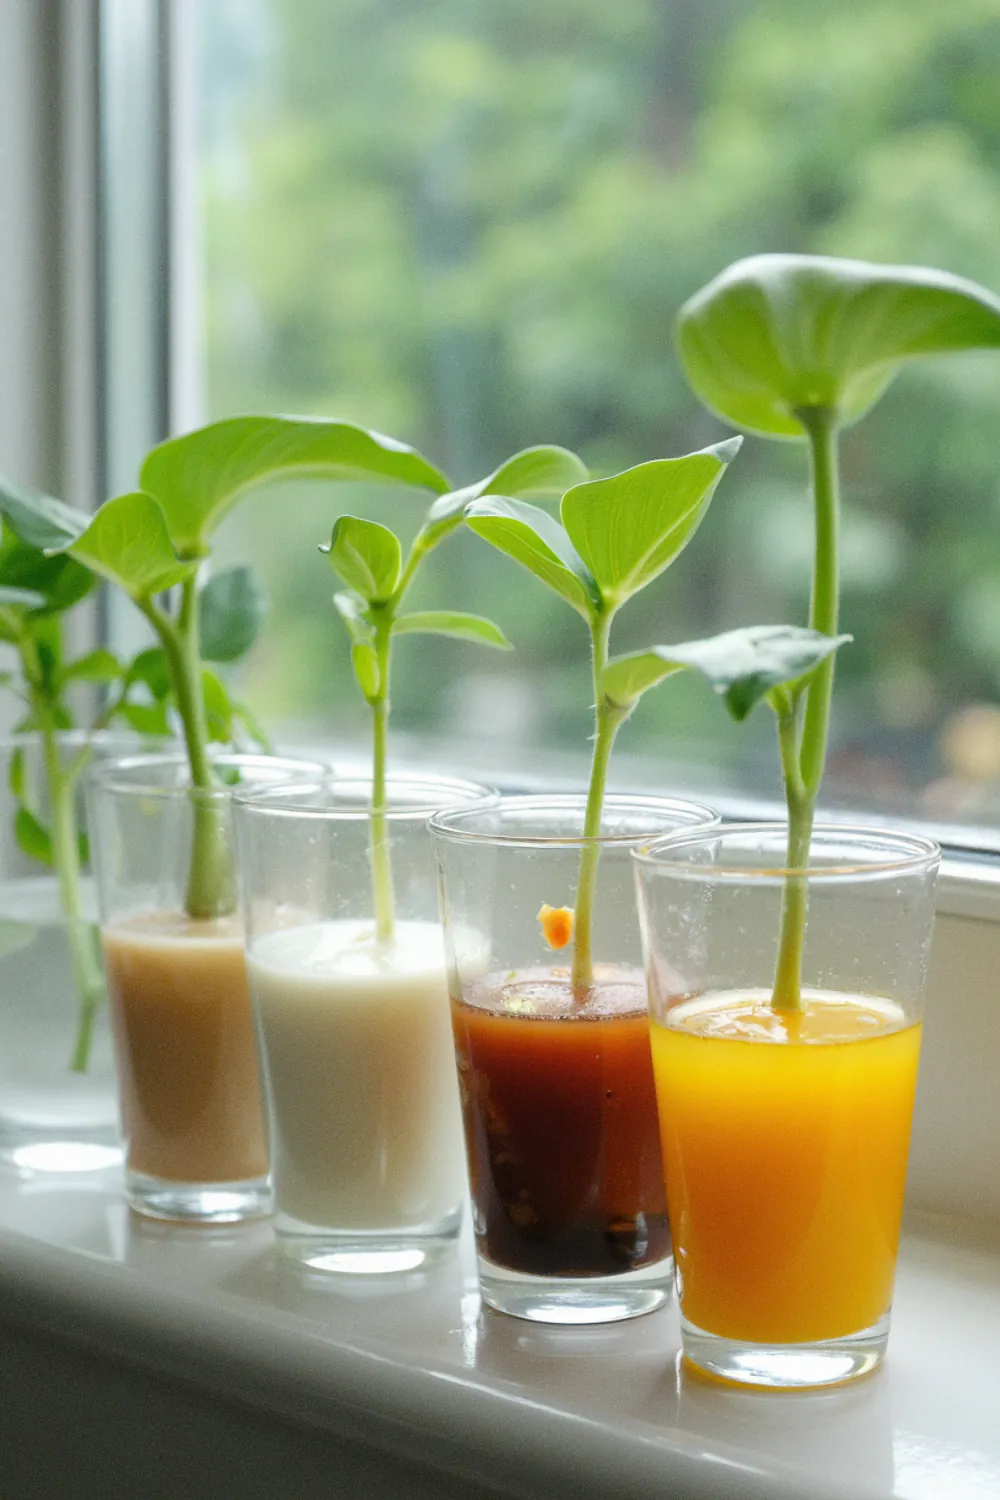
What happens when you water plants with different liquids?
Set up identical bean seedlings in similar containers, but water them with different liquids: water, milk, juice, soda, etc.
Have kids predict which plants will grow best, then observe and measure growth over a week or two.
Create a chart to track results.
This experiment teaches scientific method basics—making predictions, controlling variables, collecting data, and drawing conclusions.
Our milk-watered plant did better than I expected. Mom win!
21. DIY Bird Feeders

Create simple bird feeders using pinecones, peanut butter, and birdseed.
Spread peanut butter on pinecones, roll them in birdseed, and hang them from trees with string.
This attracts local birds to your yard where kids can observe different species.
Have children keep a bird journal, noting which types of birds visit and their behaviors.
This connects children to local ecosystem science and teaches patient observation skills.
22. Sink or Float Predictions
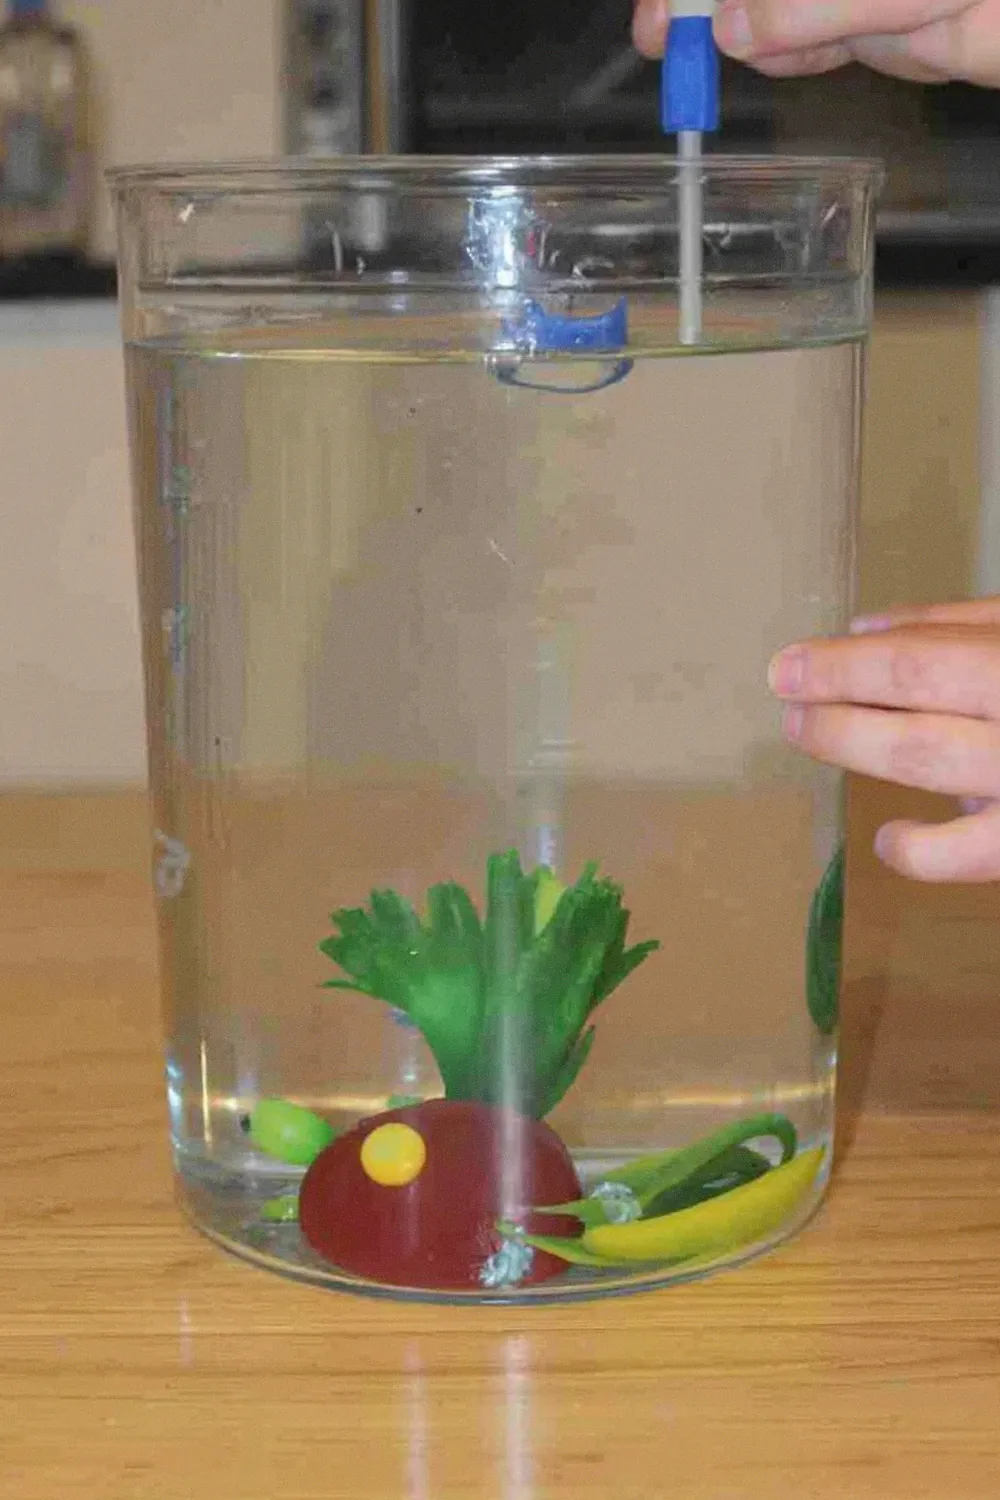
Gather various household objects and have kids predict whether each will sink or float in water.
Test their predictions in a clear container.
This simple activity introduces density concepts in a hands-on way.
To extend the experiment, try dissolving salt in the water to increase density and see if previously sinking objects now float!
Create a chart dividing objects into categories based on results.
Entertaining Spring Science Experiments Everyone Will Enjoy
Spring is the perfect time to spark scientific curiosity in our little ones, and these simple experiments create those magical “aha!” moments kids remember forever.
So grab some supplies from around the house, embrace the inevitable mess (that’s where the learning happens!), and watch your children’s eyes light up with wonder.

Leave a Reply